
Global Knowledge & Community | Local Innovation
Global Knowledge & Community | Local Innovation
We start off with making the charcoal press. The design problem here is figuring out how to shape a marshy substance into a compact mass.
For this step and the next few, you will need the following materials:
Cutting the pipe:
You will need two pieces of ½” pipe, one 7.5” long and one 2.5” long. You can cut it using a hacksaw or a band saw.
If using a band saw to cut the pipe, be very careful that the pipe is firmly gripped—the saw teeth will catch on the surface of the pipe it can cause the part to spin (with a surprising amount of force). You can use a vise to hold the part so that it won’t spin.
To cut steel, the band saw should be set at a speed of about 100 ft/sec. Be sure that the guard is set to the right height before beginning to cut.
Once the initial cut is made, turning the pipe slowly as you cut into it makes a cleaner, squarer cut.
If you are using a hack saw to cut the pieces, be sure that the pipe is held firmly in a vise, near the place where you are making the cut.
You will also need to cut a piece of 2” pipe that is 2.5” long for the cup.
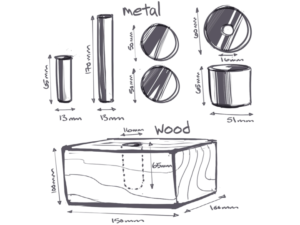
Cutting and drilling the wooden block:
Cut a 6” long piece of 4” x 4” wood. You can use either the band saw or a hand saw to cut the wooden block.
A coarser blade may be used to cut the wood, but it is not necessary. You can use the belt sander to smooth and bevel the edges.
Mark the middle of the block (you can do this by drawing diagonal lines from corner to corner, or by measuring.
Put a 15/16” drill bit in the drill press and line the tip up with the center of the block. A Forstner bit is a good option for this application, as it leaves a clean, smooth, flat bottom to the hole. If you use a twist drill, you should step up to the 15/16” hole, that is start by drilling a smaller hole, then move up to the larger bit size.
Drill the hole at least 2.6 inches deep, so that the ejector can easily fit into the hole when the briquettes are being formed.
Cutting the end plates:
The end plates of the two plungers must fit easily inside the cup. Measure the inner diameter of the large pipe and allow for 1/16” radial clearance. You will need two of these parts. You will also need an endplate for the cup.
In one method, the end plate will be press fit in and then welded along the seam, as shown in Figure 2a. For this, you will need a more precise measurement of the inner diameter: allow for a 0.002” interference fit, meaning that the inner part is slightly larger than the outer part, and will therefore stay in place when forced into position. The larger the interference, the tighter the fit; if the interference is too great, then the parts will not be able to be fit together. We will be welding the two parts together, so the fit need only hold the part in place while we are welding it, and the interference can be relatively small. Also note that more compliant materials, such as wood and plastic, can have larger interferences.
The other method for making the cup is to make a end plate which is slightly larger than the pipe, and then welded where they rest together.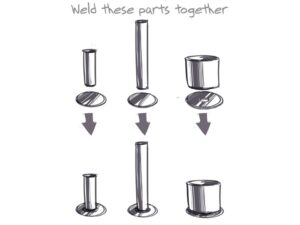
Putting the parts together; welding:
Now that the pieces are cut to size you will put them together to make the final parts. Welding is the process of joining two pieces by melting the adjacent material and having it re-solidify to form a joint. In some cases, a filler material is added.
There are four types of welding that we can do at the welding shop: oxy-acetylene welding, arc-welding, MIG welding and TIG welding, of which the first two are most widely available in the developing world.
Welding is easiest to do if the two pieces are of a similar material and of similar thickness. Otherwise, one part may melt completely while the other heating up. If one part is bigger than the other, it is necessary to adjust the application of heat so that the two parts melt at the same time.
When welding, it is very important that the pieces are held together firmly before you start welding, so that adjacent material will melt together and form a good joint and so the pieces do not move during the welding process. You will use the welding fixtures in the shop to hold the pieces together while you weld them.
Be sure to use protective clothing and goggles, as the radiation and extreme light can be dangerous to your skin and eyes.
You should assemble the charcoal press this way: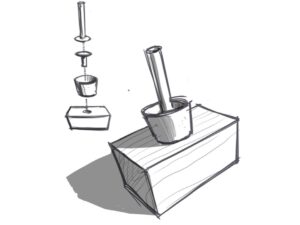
Here is the second part of this lesson. We make the kiln (for carbonization of the agricultural waste). Watch this video to understand this part of the process.
Preparing the kiln:
a) Cut a large opening for filling the kiln with the material you want to carbonize.
b) Cut several holes in the bottom of the drum. These holes allow air to flow through the drum while burning, which results in a hotter fire and produces better charcoal.
c) A piece of sheet metal is needed to cover the top hole and prevent oxygen from entering the drum, allowing the material inside to carbonize.
Remember to thoroughly wash the inside of the drum with a detergent if it previously contained oil.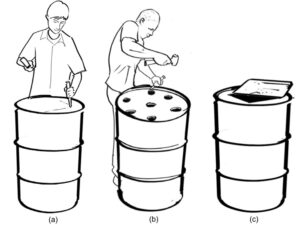
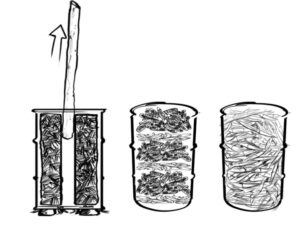
Fill the drum this way and then follow the directions in this video to carbonize your agricultural waste. 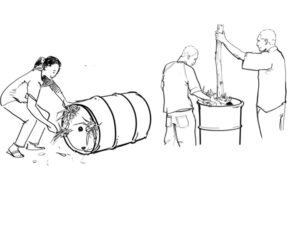
Crushing the charcoal and making the binder:
You can crush charcoal in a bag with a stick, or with a mortar and pestle using a cover to prevent dust from flaring up, or on a tarp using stones. A charcoal crushing machine can be used for large quantities.
The binder for making the briquettes can be made from many different materials: cassava, aloe, or banana.
For cassava:
– Grate one cassava.
– Mix with 1.5L of boiling water until thick and sticky. This should do for one drum of carbonized material.
– Combine charcoal and binder mixture in a vessel.
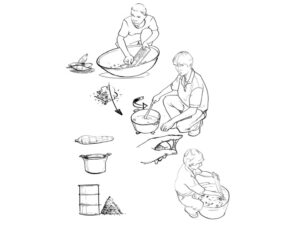
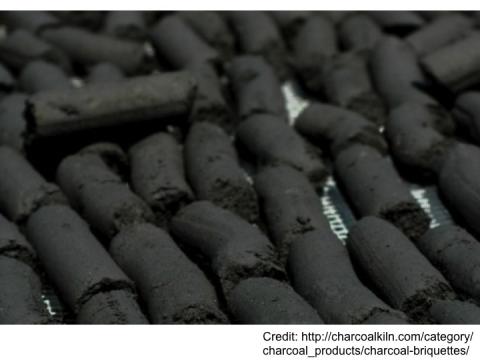
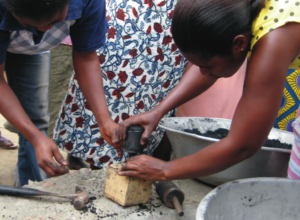
Making briquettes:
Fill the press (already made in steps 1-4) with charcoal mixture. Hit plunger to form the briquette. Then push up the ejector to remove the briquette.
Then let the briquettes dry in the sun for up to a week.
